Using MCP Servers for Design System Management
From Design to Code with MCP Servers #
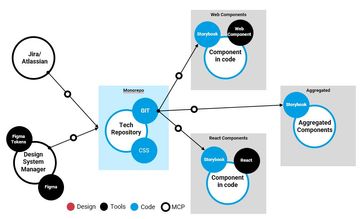
The Model Context Protocol (MCP) defines a standard way for local or remote tools to talk to models and IDEs. It lets you access external services or APIs directly inside your editor, without complex system setup or locked-in toolchains. MCP servers connect tools like Atlassian, Figma, or Storybook to your AI model and make workflows faster, consistent, and traceable.
Below is an example mcp.json configuration that we use across our Design System setup:
{
  "servers": {
    "atlassian": {
      "url": "https://mcp.atlassian.com/v1/sse",
      "type": "http"
    },
    "figma": {
      "type": "http",
      "url": "http://127.0.0.1:3845/mcp"
    },
    "storybook-mcp": {
      "url": "http://localhost:6006/mcp",
      "type": "http",
      "headers": {
        "X-MCP-Toolsets": "dev,docs"
      }
    }
  }
}
Workflow Overview #
Our workflow starts in Figma. Designers use Figma and Figma Make to create responsive UX and UI layouts for clients. Semantic structure and design flexibility are key. Once approved, design tokens are exported into a shared repository. We use Style Dictionary to generate tokens for web, Flutter, and other platform targets.

Next, the Figma MCP server connects the IDE directly to these designs. Engineers can use commands like #get_design_context, #get_metadata, or #get_screenshot to pull Figma information into the editor.
More details: Figma MCP Guide
Before development starts, the Atlassian MCP server helps fetch and manage Jira tickets. Typical actions include:
#getJiraIssue#editJiraIssue#addCommentToJiraIssue
This ensures the agent knows the ticket context before coding begins. Documentation: Atlassian Rovo Setup
For component development, we use the Storybook MCP. Still in alpha, it already provides two useful modes:
dev: retrieves component documentation or usage.docs: gives UI building instructions.
More info: Storybook MCP Addon
Using Prompt Files #
Prompt files let you define complex, repeatable workflows. Example — an icon update process:
---
agent: 'agent'
model: Claude Sonnet 4
tools: [
  'edit/createFile', 'edit/editFiles', 'search', 'runCommands',
  'atlassian/getJiraIssue', 'figma/get_design_context',
  'storybook-mcp/get-component-documentation'
]
description: 'Design System - Icon Management Prompt'
---
# Icon Workflow

1. Fetch Jira ticket
2. Pull Figma assets
3. Build and test
4. Create changeset
5. Update Jira status
Prompt files can be stored in your repo to maintain team consistency. Learn more: VS Code Custom Prompts
Instruction Files #
To make the agent aware of your coding conventions, you can use instruction files. Example for test files:
---
applyTo: '**/*.spec.*'
---
Follow Jest best practices.
These can define lint rules, review tone, or commit patterns. Reference: Custom Instructions
How It All Comes Together #
With MCP servers and prompt files, engineers can:
- Read Jira tickets directly in the IDE
- Fetch related Figma design data
- Get component documentation from Storybook
- Apply code standards automatically
- Build, commit, and update tickets: all in one flow
No tool-hopping. No lost context. Agents act with awareness of design, documentation, and project state.
This setup runs in VS Code, but also works with Cursor, Cline, or any IDE that supports MCP.
Why It Matters #
For Design System teams, context switching is the biggest productivity loss. With MCP-based workflows, you stay inside one environment. The model fetches context from Jira, design, and documentation servers automatically.
The result: fewer errors, faster delivery, and better alignment between designers and engineers.
Next Steps #
Start small. Connect one MCP server (e.g., Figma). Try simple prompts to pull metadata or screenshots. Once stable, add Jira and Storybook.
Over time, you’ll see your design system evolve from a manual process to a connected, intelligent workflow: a true continuous experience pipeline.